Background
Revere houses rich capital markets information for thousands of institutional quality sponsors, brokers and capital providers all on one networking and prospecting tool. Over the last few months we have had to get innovative with designing scalable processes for manual and automated vetting / QA processes over our tens of thousands of data points.
Ultimately we maintain a two-datastore solution for our business:
- PostgreSQL - Our application database. A normalized data store of our users, organizations and projects (deals/funds) with their associated metadata as well as other information necessary for our web application to operate.
- Airtable - A user friendly representation of our proprietary industry data that our quality assurance team can periodically vet, modify and augment. This is our source of truth. All new and existing data is processed through Airtable.
We run several recurring jobs against our Airtable instance to validate, ingest and enrich our data against our various data sources. We also run a periodic sync of data between Airtable to our application database.
As an early stage company a lot of these processes were run by hand or through one off scripts on our location machines. Recently we decided it was time to automate these jobs to save time and consolidate our various processes.
Some googling (i.e. "long running jobs GCP") resulted in a few useful tutorials. However, nearly all of the documentation involves Google Compute Engine w/ deployed images, Cloud PubSub or some use of more complicated infrastructure like Cloud DataFlow.
The Problem: We wanted to build out a minimalistic jobs solution with minimal deployment and configuration overhead.
This translated to the following requirements:
- Support job deadlines of up to 24 hours (1 day).
- Support a configurable retry policy (with exponential backoff)
- Deny public internet access to our job runner (only allow our CRON scheduler).
- Support ad-hoc execution with manual triggering
- Provide auditability of last execution and current state (logging).
Proposed Solution
To properly illustrate a solution we will define a goal. Our example job is going to calculate the number of posts made by each user (by ID) from a fake posts API.
To accomplish this we will leverage a Node.js (Typescript) web service deployed on Google App Engine along with Google Cloud Scheduler. For simplicity we will refer to this service as the Jobs Service.
The Jobs Service will have an HTTP endpoint that performs the task described above. This endpoint will be triggered at a set frequency via the Cloud Scheduler.
Prior to starting we assume that you:
- Have a GCP project setup with billing and the appropriate IAM permissions setup.
- Have Node.js and npm installed and configured on your machine.
- The gcloud SDK is installed, authenticated and configured.
Implementation
Application Setup
In an empty directory copy the following into a package.json:
{
  "name": "jobs",
  "version": "1.0.0",
  "description": "GAE Standard Environment services for running scheduled jobs.",
  "main": "index.js",
  "private": true,
  "scripts": {
    "build": "tsc -p .",
    "gcp-build": "npm run build",
    "start": "node build/index.js"
  },
  "dependencies": {
    "express": "^4.17.1"
  },
  "devDependencies": {
    "@types/express": "^4.17.12",
    "typescript": "^4.3.4"
  }
}
Since we are utilizing TypeScript we must also create a tsconfig.json with the
following contents:
{
  "compilerOptions": {
    "target": "es5",
    "module": "commonjs",
    "lib": ["DOM", "es6"],
    "allowJs": true,
    "outDir": "build",
    "rootDir": "./",
    "strict": true,
    "noImplicitAny": true,
    "esModuleInterop": true,
    "resolveJsonModule": true
  }
}
After this we can initialize the project by running npm install. Now we can
scaffold out our service with ExpressJS. Create a file called index.ts and
copy the following contents:
import express from 'express';

const app = express();
const port = process.env.PORT ?? 8080;

app.listen(port, () => {
  console.log(`Jobs service listening at http://localhost:${port}`);
});
This will be the entry point to our application and where we will register all of our future jobs that need to be scheduled and executed.
Our First Job
Let's create a folder called jobs and our first job inside it:
process_posts.ts. Paste following content into process_posts.ts:
import axios from 'axios';
import type { Request, Response } from 'express';

interface Post {
  id: number;
  userId: number;
  title: string;
  body: string;
}

export async function run(_req: Request, res: Response) {
  try {
    const res = await axios.get(`https://jsonplaceholder.typicode.com/posts`);

    // We assume that the response here is status 200.
    const data: Post[] = res.data;
    const result = data.reduce((ret, post) => {
      ret[data.userId] = (ret[data.userId] ?? 0) + 1;
      return ret;
    }, {});

    console.log('Calculated posts by users:', result);
  } catch (e: unknown) {
    console.error(`Unable to process posts, got error: ${e}`);
    return res.status(500).end();
  }
  res.end();
}
This is the implementation of the job to process the number of posts for each user. Generally these handlers can be utilized for manipulating Airtable data (like in Revere's case), migrating information between data stores, generating statistical models or anything else that can be accomplished within 24 hours.
To create an entry point to this job we will add the following lines to
index.ts:
import { run as runProcessPostsJob } from './jobs/process_posts';

// ...

app.post('/jobs/process_posts', (req, res) => {
  return runProcessPostsJob(req, res);
});

// app.listen(...)
Before this is executable we have added a new dependency (axios) that we need
to install by running: npm install --save axios. Our very first job is ready
to run on the cloud... so let's deploy it!
Deploying your Job
Google App Engine requires that every service deployed be configured via an
app.yaml file in the service's repository. Create a new file in the root
directory of the project called app.yaml with the following contents:
runtime: nodejs14
instance_class: B4

basic_scaling:
  max_instances: 1
  idle_timeout: 45m

handlers:
  - url: /.*
    secure: always
    redirect_http_response_code: 301
    script: auto
You should also create a .gcloudignore file to prevent uploading unecessary
files with the following content:
.gcloudignore
.git
.gitignore
/node_modules/
With the configuration above you are now ready to deploy your own "Jobs Service"
up to GCP. Run gcloud app deploy which will deploy your service as the
default service in Google App Engine.
If you already have a default service add a service configuration to your
app.yaml file. See the
service element
in GAE documentation.
Configuring the Firewall
Before we proceed with scheduling our job we will first firewall off public internet access to the GAE service. Since the only intended invocation of this service is through Google Cloud Scheduler we will reflect that in the GAE Firewall Rules console.
- Set the
defaultpriority rule to actionDenywith IP Range*. - Create a new rule with priority
100and IP range0.1.0.2/32with actionAllow.
Scheduling Your Job
Now that the job is up and running and secure we can set up the scheduler to trigger running this action at a set interval.
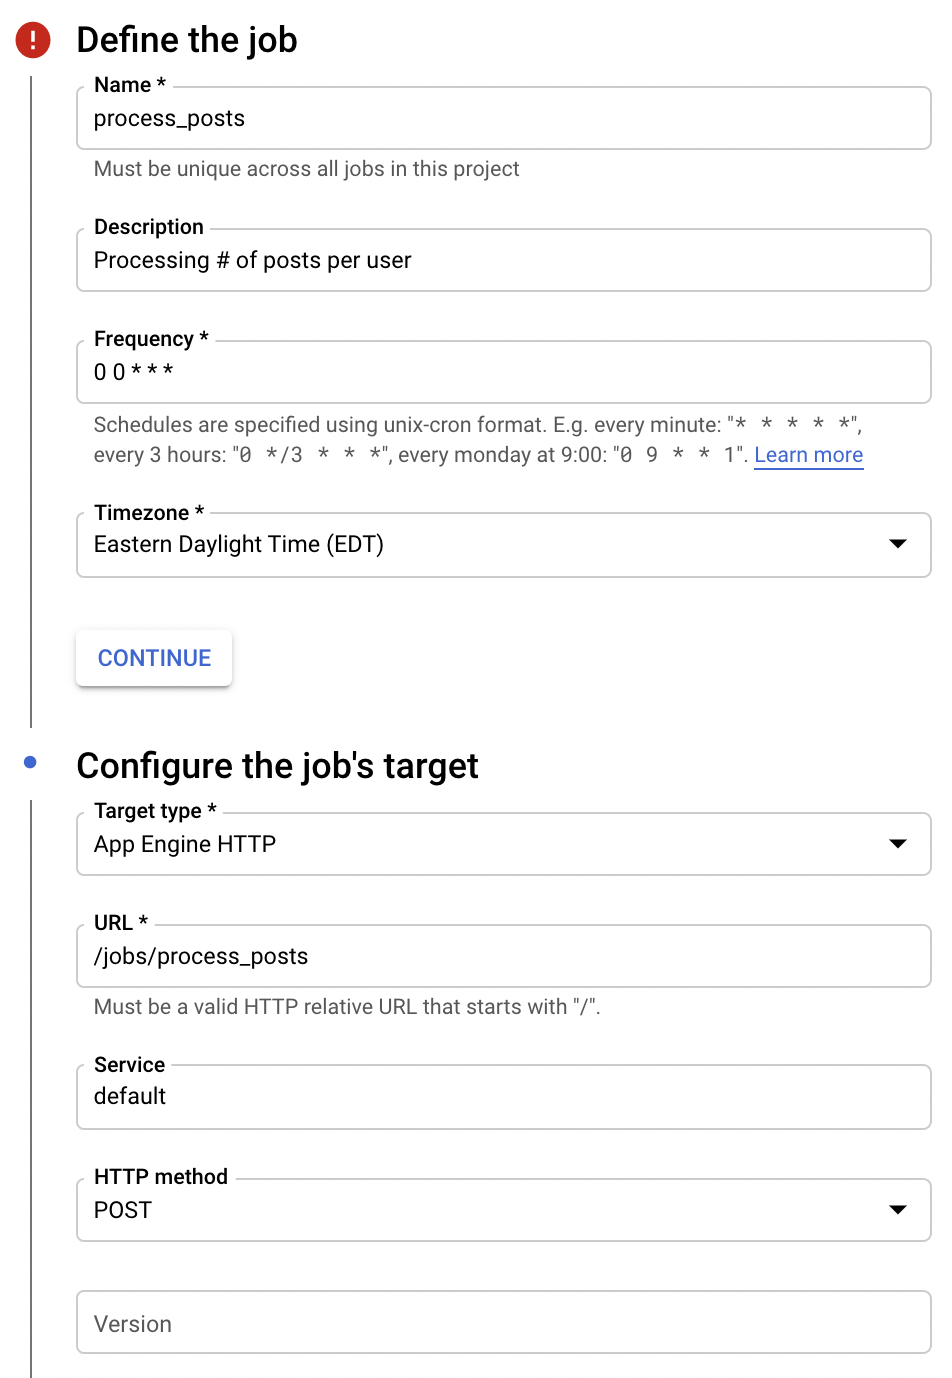
Aside from a name and description you must configure:
- The
FrequencyandTimezoneof the scheduled job. This determines when your job is triggered. Target Type- This must be App Engine HTTP.URL- This must be the URL your job endpoint is hosted under configured earlier inindex.ts.Service- Configure to point to the App Engine service running the jobs endpoints.
Below this is the configurable retry policy. This can be configured to your liking.
After you click Create your job is set up and will begin running at the
desired frequency you specified! You can also click Run Now to trigger the
job manually.
To debug this you can utilize Cloud Logs Dashboard to view your App Engine
service's logs and see how your job is performing.
Appendix
Why App Engine
Using Cloud Run or GCE which has greater configurability and control only allows for a 15-30 minute deadline (depending on environment) via Cloud Scheduler.
Unfortunately a truly robust setup with longer deadlines (>24 hours) will require extra infrastructure such as Cloud Dataflow or Cloud PubSub with further redundancy and overhead.
This solution optimizes a relatively long (24hr) deadline with relatively minimal configuration and overhead (a single YAML file for configuration). This also scales to 0 automatically based on usage.
Inter-App Communication
A lot of times your job may need to communicate with other services within your ecosystem. A good way to authenticate between applications is using an OIDC token to authorize/authenticate the caller.
After granting your App Engine service account Service Account Token Creator
on the service account running your other service you can utilize the following
function to mint an OIDC token:
// File: util/iam.ts
import { IAMCredentialsClient } from '@google-cloud/iam-credentials';

// Creates a client for generating ID tokens for the purpose of inter-service communication.
const client = new IAMCredentialsClient();

export async function generateIdToken(targetServiceAccount: string) {
  try {
    const [{ token }] = await client.generateIdToken({
      includeEmail: true,
      // CHANGE THIS.
      audience: 'https://url/to/service'
      name: `projects/-/serviceAccounts/${targetServiceAccount}`,
    });
    return token ?? null;
  } catch (e: unknown) {
    console.error(`Unable to generate ID Token: ${e}`);
  }

  return null;
}
The minted token can be sent as part of the Authorization HTTP headers as a
Bearer token. This then needs to be validated on the receiving side. In the
Node.js ecosystem you can use the
google-auth-library
OAuth2Client.verifyIdToken method.